You just found out your pregnant and you are ecstatic to begin this new chapter in your life! Whether you got pregnant on the first try or it took a few years this is truly a magical time.
There are probably so many items on your to do list, try not to get overwhelmed but enjoy the next 9 months. Sometimes our day to day life is too hectic to really sit back and realize that you have a miracle growing inside you and that time is fleeting.
In between all the doctor appointments, shower registries and preparing for your new arrival here are a few ideas to not only track your pregnancy but to record the next 9 months of your journey with your little one.
While doing each of these may be too demanding on your schedule, if you can fit in one or two you will appreciate it as those little miracles grow up.
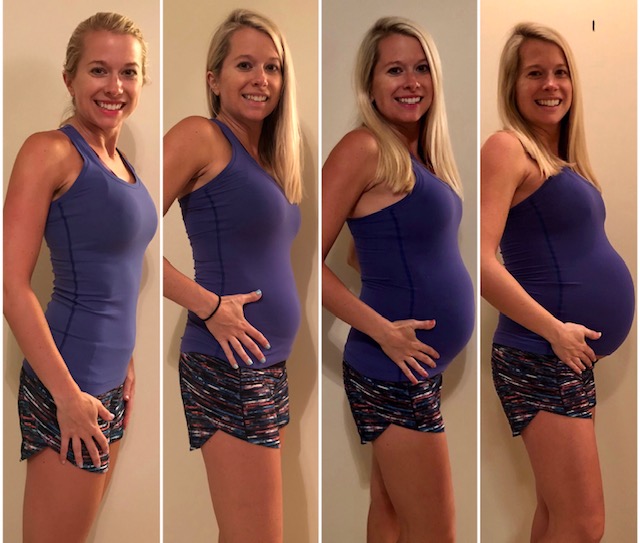
Weekly/ Monthly Pictures of Baby Bump
Create a calendar invite for each week, mine was set for Sunday. Take a few pictures each week to watch your belly grow.
Short Videos of Mommy and Daddy to Baby
Make short videos (1-2 minutes) after doctor appointments or anytime for your baby as time allows. We plan to string these together and share with our daughter when she is old enough.
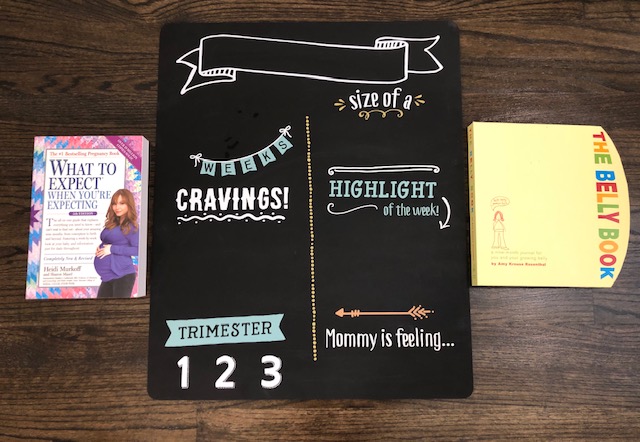
Baby Board
Highlights can include the baby’s developments this week or even just what you did with your baby bump the past week. You can do this weekly or monthly. Bed Bath and Beyond sells a good board to use for this, Pearhead Pregnancy Chalkboard.
Pregnancy Journal
You can create your own, or buy one in store or online. They help keep track of how you felt physically and emotionally during your pregnancy, as well as Doctor appointments, ultrasounds and your baby’s first movements. You can really add any additional details you want as well. I used The Belly Book.
Pregnancy Book
Every first time mother wants to know what she should be doing, eating, activities that should be stopped and so much more. Your Doctor will probably provide you with packets or a booklet with some general guidelines, but it is also great to buy a book to read alongside that. I have enjoyed reading “What to expect when you are expecting.” It discusses developments that happen every week, answers to common questions, what to expect during each month of pregnancy, food safety and much more.
Pregnancy App
I used Ovia Pregnancy, which was great! I first used the Ovia Fertility & Cycle Tracker while we were trying to conceive, which was very helpful. Once we became pregnant I added this app to my phone. It gives daily updates on baby’s developments, includes relevant articles and videos, tracks progress through pregnancy, has a food safety lookup feature which is so convenient and perhaps my favorite part of the app. It is especially helpful when you are out at a restaurant. There is a lookup feature for medication safety, as well as symptoms you may be having (to make sure they are normal). The app has many other great features too, so be sure to check it out.
Before baby arrives and after you will be inundated with items your family, friends, co-workers, and of course advertisers say you will need. As a parent you want to make sure your baby has everything they need and it can become expensive quick. Luckily, a newborn baby doesn’t need much more than love, milk, sleep, diapers, wipes and of course diaper rash cream. Below are some items that I have found essential as a first-time Mom.
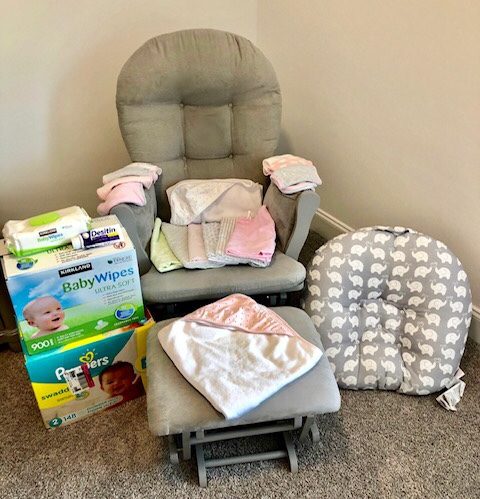
The Essentials
Diapers– We have used Pampers Swaddlers from the beginning for little K. The hospital used these and gave us a few packages to take home. These worked perfectly for our baby and caused no irritation. We tried the pure pampers but since we didn’t notice any difference we stayed with the regular swaddlers as they were cheaper. Unfortunately, Costco does not carry these, so we buy them from Target or Walmart.
Wipes– We first bought the Huggies Natural Care wipes from Costco. They were great and caused no irritation on little K’s skin. Then one day I decided to try the cheaper Kirkland Baby wipes. They still work great and still do not irritate little K’s skin. The one complaint is that they are not quite as wet as the Huggies. We are still using them though, I think it’s nice to not have too much moisture on the wipes since it can then lead to the babies skin being left wet. We buy these in-store at Costco.
Desitin– We use the Maximum Strength Desitin, we used to buy the 3 pack from Costco. Yes we are Costco frequenters… Diaper rash was one of our biggest concerns, so we wanted to be extra vigilant. Luckily, this has worked perfectly with no diaper rash yet. Our Costco unfortunately does not carry the 3-pack anymore, but you can order a smaller single tube from the pharmacy. Amazon, Target and Walmart all carry these and depending on what sales are going on you may be able to get these cheaper there.
Best Purchases
The Boppy– Hands down, this has been by far our best purchase! It is like a cozy recliner for a baby. We have used it every day since little K was born. She absolutely loves it! We even use it for bottle feeding. We wanted to make a clear distinction between breast feeding and bottle feeding so there would be no nipple confusion. It has worked very well and little K has no problem taking one bottle a day and breastfeeding the rest of the time. This was her favorite place to be for the first 3-4 months of her life. She is getting too big for it now but still loves to take a rest in it every now and then. We bought this from Bed Bath & Beyond but many other stores carry it too.
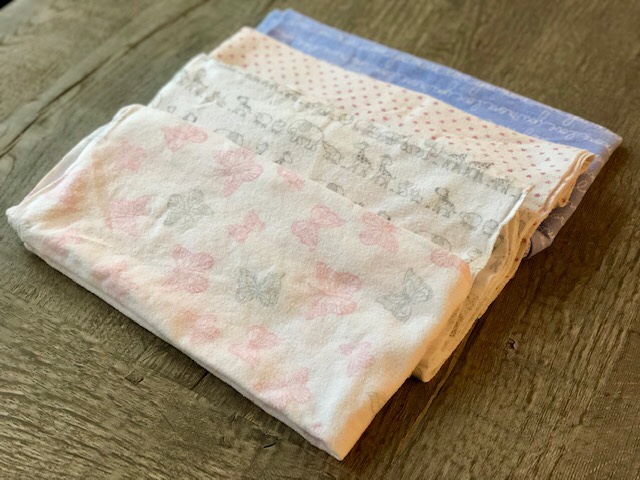
Receiving blankets– You can’t buy too many of these! I had no idea how handy these would be. One of our friends had given us a lot of their leftover baby items. They had included stacks of these in the bag. We decided to keep them just in case we needed them, but had no idea how much of a necessity these were, let alone how many we would use on a daily basis! They can be used for spit up, burp clothes, a changing pad, a cover for a changing pad, blanket, and so much more. We use these all day every day! These can be bought anywhere, we use the flannel ones.
Burp Cloths– Another major necessity. The more you buy the less times you will have to do laundry daily. Little K goes through these quick! We bought these from buybuy Baby and Target.
Hooded bath towels– These are great for keeping your little ones head warm after bath time. We got ours from Bed, Bath & Beyond.
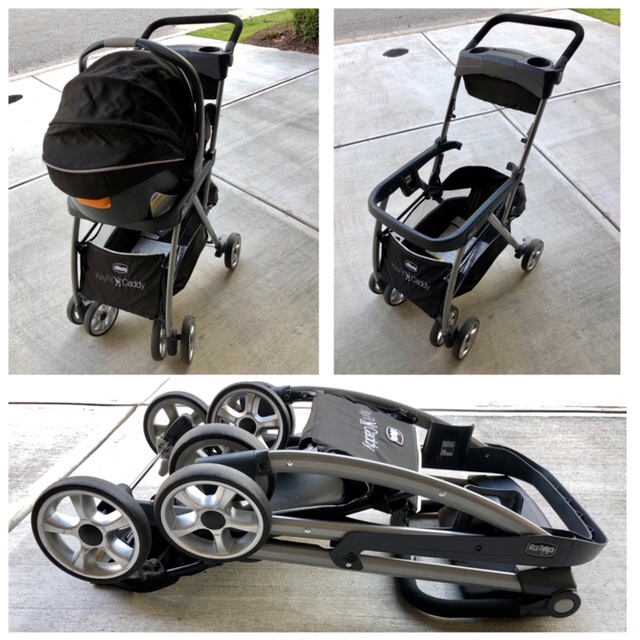
Chicco Keyfit Caddy– This was also one of those amazing purchases. We bought this because of how compact it is. It is quick and easy to fold down, light weight, has an adjustable padded handle and a large storage space underneath. The storage compartment can hold a large diaper bag, personal items and even a ton of groceries when shopping. Of course don’t forget to pull them out when you check out! A cashier checking me out said, “you fit all of that underneath that cart?!” she was truly amazed and frankly so was I. This is great for heading around town or for travelling. In order to purchase this you will need to have a Chicco car seat. We bought from Bed Bath & Beyond.
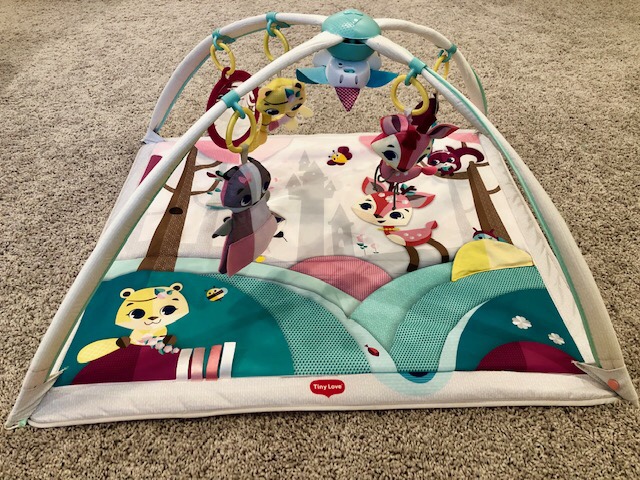
Playmat– I have the Tiny Love Deluxe Gymini, which has four toys and a mirror that dangle from the arches, and a bird that attaches to the top that lights up and plays music with different play modes. The mat is decently soft and the back of it has a material that has prevented little K’s spit up from seeping through. This can be used for playtime, tummy time and more. We detach some of the toys from the arches and use them during tummy time for visual stimulation even if we are not using the mat for tummy time. It was amazing to watch little K just look at the toys to grabbing them with both hands! I think the mat has helped with her hand eye coordination. We bought from Bed, Bath & Beyond.
Bottles, Pacifiers and Pumping
Pacifiers– I had bought several different pacifiers as I did not know which one little K would like. At first she enjoyed the one from the hospital, but it ended up causing more problems with breastfeeding so I decided to try the other ones we bought. The only one she liked was the MAM Night Pacifier. The button glows in the dark which is helpful, however that only works if the paci falls out and lands button up. I would suggest getting the ones with a pink or green shield as the clear ones fade into the crib, ground or wherever they happen to land. We bought these from buybuy Baby.
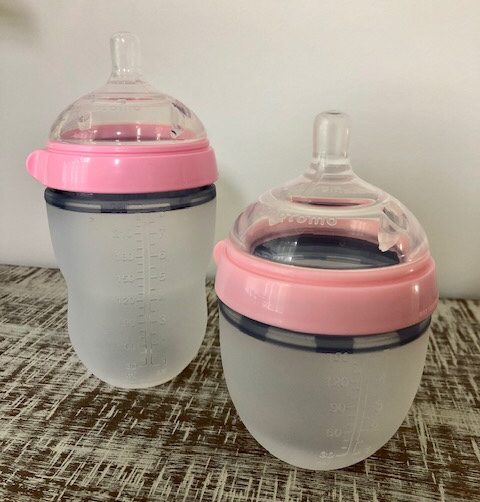
Bottles– Comotomo bottles are amazing! Little K has taken this bottle from the first day we introduced it when she was about 4-5 weeks old. They are small, slow flow and try to simulate the feeling of a breast. For 0-3 months there is a 5 oz bottle with slow flow and then 3-6 months there is an 8 oz bottle with medium flow available. There are also high flow tips available but we haven’t tried these yet. We recently changed to the medium flow and that was amazing. The slow flow is great up to 3 months and maybe even a little longer, but then you will need to upgrade to the medium flow tip. The tops of the bottle are interchangeable, so sometimes we will still use the 5 oz bottle with the medium flow tip as little K loves to hold her bottle and this is more her size for those cute little hands. Bottle feeding drastically decreased in time and little K was much happier with the flow. While not all babies are the same and I know some of my friends say they went through 10 different bottles before finding one they liked. I personally think this one is great.
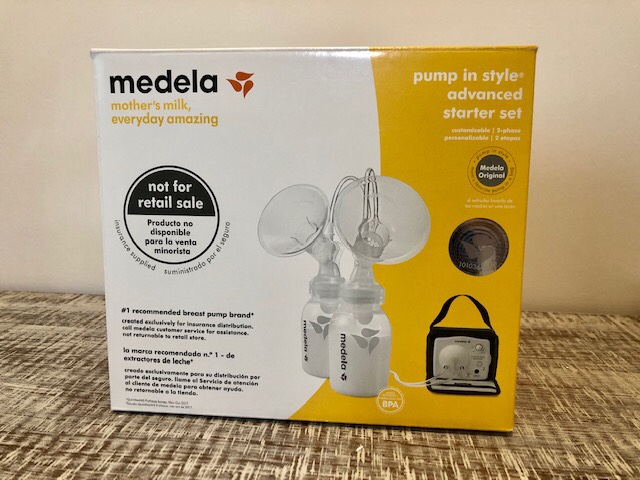
Medela Pump– for many women the breast pump will unfortunately be your new best friend. Insurance typically covers a certain level of breast pumps and mine happened to cover this one along with others in its class. After reading reviews, talking to colleagues and friends I decided this one was for me. It works incredibly well. Typically each pumping session takes about 20-25 minutes, it can be shorter or longer depending on what level you set and how much you want to pump. The parts are easy to clean and it’s small so transporting it is not a big deal. While not always the most fun ladies, at least you can burn about 20 calories for each ounce of milk produced.
Medela Easy Expression Bustier– My pump did not come with anything to make it a hands free pumping experience. Who wants to use both hands while pumping? I bought this from Bed, Bath & Beyond and it has worked great.
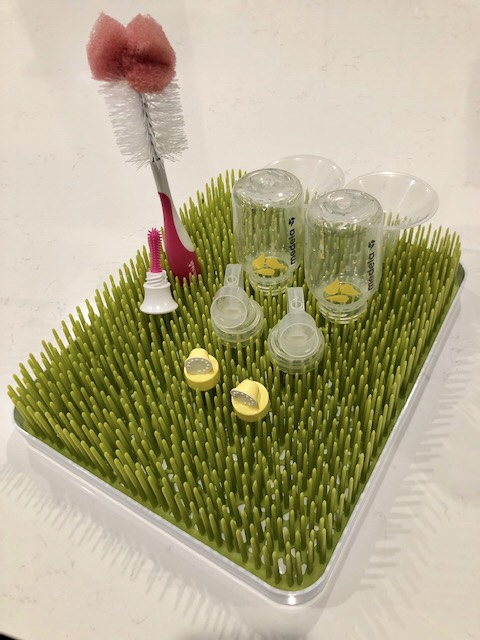
Boon Grass Countertop Bottle Drying Rack– I use this all day every day. After pumping it is used to hold all the plastic pieces needed for pumping along with bottles. It works great as I carry it between floors in our home when I pump in a different room. I bought from Bed Bath & Beyond.
Glider/ Rocking chair– I always wanted a wooden rocking chair, like the one my Mom used when I was little. After looking around I decided the wooden rockers didn’t fit into our nursery. In opening my mind to other options I started looking at gliders, which in general were fairly expensive. Then I came across the Angel Line Windsor Glider and Ottoman, Gray w/ Gray Cushion at Walmart. It was only $130, which was significantly cheaper than gliders I had seen elsewhere. At first we were a little hesitant on going for the cheapest chair due to quality concerns. However, this was such a great purchase. Not only was the quality great, it matched our baby furniture (crib, dresser and changing table) from Costco and it is fairly easy to clean. Typically we spot clean the cushions, which works fine. After so many spit ups, we decided to put the cushions into our front load washer (I would probably not put it in a top load washer) and the two main cushions came out fine, while the arm cushions came out a little distorted. If I had to do it over I probably wouldn’t have washed the arm cushions, but now they are clean at least. I believe the cushions are dry clean only but the front load washer worked for me on a delicate setting.
Clothing
Onesies and Sleepers– In buying clothing for little K it seems every brand has different sizing. I look at a 3 month from Gerber, Carter’s, Little Me and and they all look so different. Be aware when buying these as there are huge discrepancies. Also, remember depending on the size of your baby they may be out of newborn clothing shortly after they are born so try not to overbuy that size. Having said that you will need several of these between spit ups and blow outs, we typically sized up so Little K would be more comfortable and we would be able to use them for longer.
Halo Sleepsack– These were great! Unfortunately you cannot have your newborn sleep with a blanket, so this is a cozy alternative to keep them warm at night. We tried swaddling little K like the nurses at the hospital showed us, but she was able to slowly break out of those through the night. We tried this as an alternative to swaddling and they worked great. They save time and little K loved it. The Halo sleep-sack multi-way is adjustable so you can wrap the baby tighter or looser depending on your preference. You can also wrap around the arms to prevent the newborn startle reflex, or you can let their arms free. We also used the regular Halo sleep-sack too.
Sleeping
Crib– We bought a convertible crib set from Costco so the furniture can grow with little K as she grows. The crib can convert to a bed, and a dresser and changing table came with the set. We opted for all 3 pieces as it is so hard to find another matching piece if you decide later that you need more drawers for storage. Luckily, we did this as our set is no longer sold, nor are the individual pieces sold and this is only 6 months after purchasing. The changing table has two large drawers, and two smaller ones. The dresser has 4 large drawers. We use all the drawers and I could use more! More storage is always better to hold all those burp cloths, receiving blankets, onesies and more!
Bassinet– While a bassinet is not cheap, I believe every penny was worth it on this item. It helped solidify our sleep routine with little K. She was sleeping through the night by 10 weeks and we were able to transition little K to her crib at 13 weeks with no issues.
The Halo bassinet was given to us at our shower and was essential in little K’s first few weeks. This particular bassinet swivels 360 degrees and it’s height can be adjusted so the baby will be at your eye level while sleeping. The legs of the bassinet can go under the bed, so I was able to sleep right next to little K but without the risk of putting her in our bed. I absolutely loved it! It made those first few nerve wrecking weeks of having a new baby so much easier being able to have her right next to me. The walls are a mesh, so they are breathable and I could see right through them. The bassinet plays music, vibrates and has soothing sounds. Little K especially loved one of the soothing sounds, similar to white noise and rushing water so we played this each night for her. This became part of her go to bed routine and ultimately helped her sleep better. If she woke up in the middle of the night it was very easy to comfort her without even leaving the bed. For feedings she was so close that it made it seamless to pick her up quickly as she was right next to me.
There are many more products that have been useful, but these are the ones I would start off with. I will be adding additional posts to discuss toys, books and more items that I have found useful as little K continues to grow.
In buying products I always look at the return policy prior to buying as so many toys and items you buy may look different in person when ordering them, or your baby may even grow out of them by the time you receive them. My favorite stores to buy from are Costco, Bed Bath & Beyond and buybuy Baby due to their return policies, helpful customer service and 20% off coupons (Bed, Bath & Beyond & buybuy Baby). I also buy from Target and Amazon for convenience.
You will notice I bought a lot of the products above from Bed, Bath & Beyond (online, not in stores) instead of buybuy Baby. I did this due to the number of Bed, Bath & Beyond stores that are located near me (in the case I had to return in item), the buybuy Baby is a little further away. If looking to buy in store you will need to go to buybuy Baby as Bed, Bath & Beyond does not carry most of these items in store. Buybuy Baby also has an amazing selection of clothing, just like Target does. If you are lucky to live in a city with a buybuy Baby definitely go check it out! Happy shopping!
After 40 weeks, the big day is here! Or is it? I hit my 40 week mark and there I was still pregnant! I tried everything including spicy thai food, garlic, pineapple, raspberry leaf tea, and eggplant parmesan, but nothing worked. I walked 10,000 steps a day… yes I really did walk that much and still nothing happened. I had a very healthy pregnancy and was used to running and walking every day which is why I was so mobile at the end. Whether you are early, on time or late that big day will eventually be here.
I chose to divulge my birthing experience since I had so many questions prior to giving birth as a first time mom. Between friends, google and other moms sharing their experiences it helped calm my nerves, so I wanted to do the same for other soon to be mommys!
As everyone does, I had a birth plan that I was hoping to follow. I thought with my active and healthy pregnancy I would be able to go into labor myself without any intervention from my doctor. Unfortunately, that did not happen and I was just along for the ride!
To say the least my birthing plan was modified quite a bit when I went into the 40 week doctor appointment. The doctor told me I was dilated about 1-2 centimeters and effaced at 50%. They had me schedule an appointment for one week later, at 41 weeks on the nose. If I did not go into labor by then they would schedule an induction for that day. Alternatively, I could just schedule an induction for the day before I turned 41 weeks. After reading about inductions, it seemed there could be a greater chance of a c-section if I was induced. In addition there would need to be another night spent at the hospital while receiving both Pitocin and Cervidil. I was interested in doing an all natural birth, including no epidural, so this did not interest me unless absolutely necessary.
I considered the options over the next few days and made a few more calls to my doctor before making a decision. The practice I was using did not want me to go past 41 weeks as they said nothing good comes from waiting beyond that gestation. I decided I’d rather not come in for an additional appointment just to hear that I would have an induction later that day. I called the doctor back and scheduled the induction the last day they would let me go, which was the day before I turned 41 weeks.
I did not give up hope on a natural birth and every day I tried something new that I had either read online or heard from friends. No luck with any of them. This baby girl was coming on her own time or she was going to be forced out it seemed…
Hospital Bound!
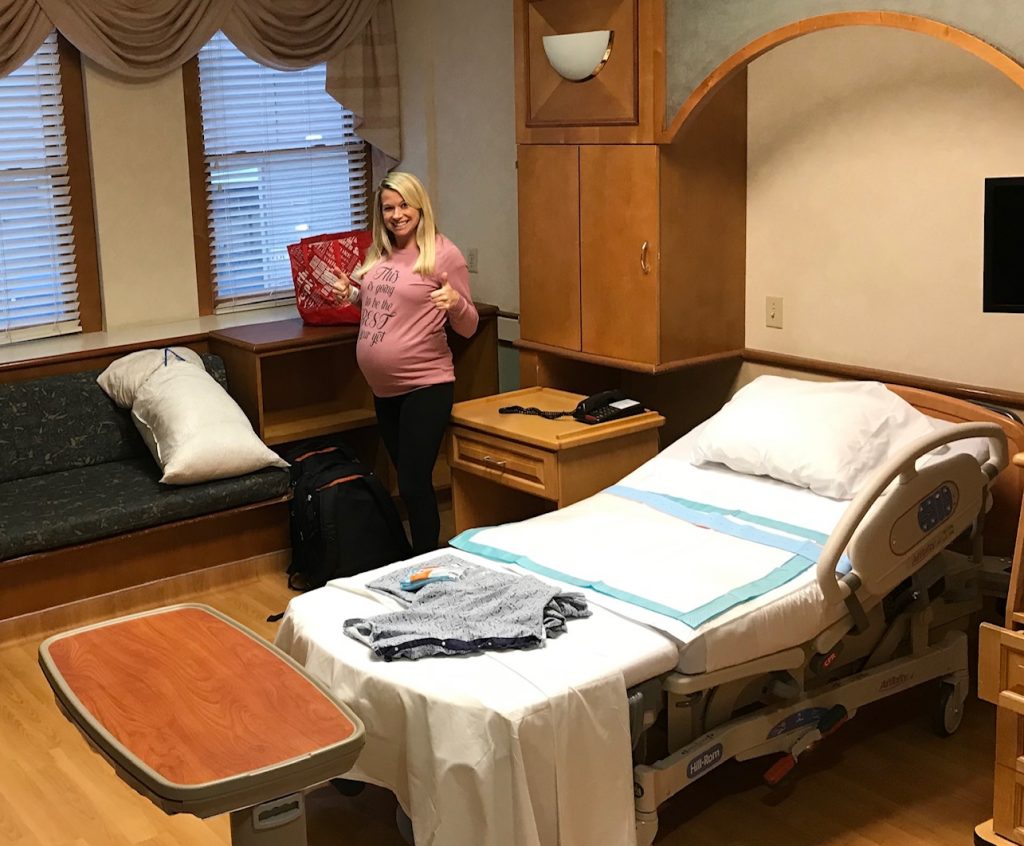
That fateful Sunday rolled around and there I was still pregnant! The way my hospital began the induction process was to give me a call sometime after 12 PM that day to tell me to come in. I was essentially on call since they did not know when a bed would be free. At about 2 PM I received the call saying it was time to come into the hospital for the induction.
Taking a step back, induction was not what I planned for, nor what I wanted, but the experience wasn’t all that bad. My husband and I had extra time to pack anything we would need. We had an additional week to get prepared for the baby, spend time together and anticipate the birth. We were prepared and relatively calm heading to the hospital, as there were no contractions and nothing unexpected occurring.
Decision between Doctor and Midwife delivery
While you are pregnant part of your labor plan will include whether a doctor or midwife will be delivering your baby. I was set that I wanted a doctor to deliver me from the beginning, so I tried to set up every prenatal appointment with a new doctor in the practice. It was extremely unlikely I would actually get my doctor for delivery unless I delivered during office hours, as they all rotated night and weekend call.
When making the decision on whether to go the doctor or midwife route be sure to find out what the chances are you will actually get the individuals you want to deliver you and how often they are on call. This is very important because you will want to feel comfortable with whoever is delivering your baby. It is a good idea to meet all the doctors and midwifes in your practice or as many as you can.
After attending a Childbirth Essentials class, the knowledge, experience (15+ years) and personality of the teacher, who was also a midwife caused me to alter my labor plan. If she was on call I wanted her to deliver my baby. During this class we also learned the main differences between a doctor and midwife delivery. Typically midwifes are much more hands on prior to active labor. I liked the fact I knew she would be by my side throughout the entire labor process. While doctors will be with you during the active labor, midwifes are typically by your side long before that and helping you in any way you need.
Midwifes are also typically more flexible throughout the whole labor process and do offer more options for pain management and delivery. If you choose a doctor the nurses typically play a larger role prior to the active labor.
However, doctors do offer an extremely high level of education, knowledge and will be able to handle any complications that arise. Even if you choose to go the midwife route you may need to have a doctor intervene should any complications arise. Check with your doctors office to see how a doctor delivery can differ from a midwife.
Another factor in deciding if you would like to have a physician or midwife deliver you may be the rate of c-sections. It was about 40% for physicians and 20% for midwifes in my practice. While both are high, 40% seemed alarming. It is a good idea to ask for these rates when making your decision.
My midwife was absolutely amazing throughout the whole delivery process and worked to ensure I had a vaginal delivery. When we have our next baby (if we are so lucky) I can only hope I can have her by my side again. However, I did not feel the same way with other midwifes in the practice. I would still highly consider having a physician deliver me if I could not have this midwife as they offer an extremely high level of experience and education.
The week prior to my due date I asked for the on-call schedule for doctors and midwifes. I was allowed to switch paths through the day I went into labor. When I went past my due date I asked for the next weeks schedule. Ultimately my decision to go the midwife route was made that last week looking at who would be on call for my delivery.
Process for Induction
We got to the hospital, checked in and were taken to our room. Shortly after our arrival the first nurse came in to take vitals and set up the IV in my arm to be ready to give fluids. They then checked to see if I was dilated any further. Unfortunately nothing had changed since the prior week so the Cervidil was inserted at around 7 PM. Cervidil can help to dilate your cervix. It is a small vaginal insert that will stay in place typically for 12 hours. It looks similar to a tampon but much smaller so be careful apparently they can fall out. Mine did not, but you don’t want to have to go through the insertion process twice.
This was a quick procedure, but now the nurses needed to monitor both myself and the baby until they removed the Cervidil the following morning (12 hours later). There was one heart rate monitor on me and one on the baby. Now it was just a waiting game. We ate, talked and tried to go to bed early as we knew the next day was going to be busy, exciting, stressful and we would soon be a family of three!
It was very difficult to sleep for many reasons. First of all, you are in a hospital bed, then you have to be careful how you lay down not only for the baby, but also because of the heart rate straps that are tracking the baby and you. If you move the wrong way and the tracker comes off, the alerts will sound and the nurse will rush in. Then when you get up to go to the bathroom you have to remove the cords for the tracker to the monitors and reattach them once you got back to your bed. In addition, the monitors and heart rate belts were pretty loud. We would have the nurses turn them down in our room, but inevitably the next nurse would come in and either turn them up or forget to turn off the monitors which are way to big and bright to be a night light. If you are scheduled for an induction, try to get some sleep before heading to the hospital!
Throughout the night several nurses came in to make sure everything was alright, along with the on call doctor who wanted to introduce themselves. Every time you think you are about to get to sleep another person seemingly comes in.
The most uncomfortable part for me was the IV. It was not inserted in the typical place where I get blood drawn from, but half way between my wrist and elbow.
After the relatively sleepless night it was time to await the check-in with the midwife (since I had chosen to go with a midwife delivery).
My midwife came in to check on me around 7:30 AM. The Cervidil had worked and I was 3-4 centimeters dilated. The next thing was to decide if I wanted an enema. Of course that was not something I would want in any circumstance. It sounded very uncomfortable, but I spoke to the midwife and nurses about the benefits of doing one. I was told this could jump start contractions, so I opted to do this as anything to avoid Pitocin was worth a shot. It did work and I started having contractions!
Pitocin and Epidural
At this point my midwife told me I could take some laps around the delivery wing to try to get the labor jump started. I took several laps and my contractions were coming almost every 2 minutes and lasting about a minute. Despite the frequency they opted to start the Pitocin to make sure contractions would continue and the baby would come.
The Pitocin was pretty awful. After trying to go without the epidural for a few hours, the contractions were coming so fast and hard I opted to have one. The epidural was a pretty painless process. I had a great Anesthesiologist who was very quick and did a good job. The worst part about an epidural is you can no longer stand up and move around, you have to remain in your hospital bed.
On second thought, the worst part may have been the catheter. That is very uncomfortable and pretty awkward. In addition, you are no longer allowed to drink water or eat food, only ice chips. Oh the joys of having a baby! Totally worth all of the splendors of pregnancy and labor to meet that little one, but oh so awkward at the time! Anyways, the epidural was amazing and perhaps too amazing! My midwife then allowed me to “labor down”. Basically, I took a nap for an hour or two and by the time I woke up it was time to start pushing and have a baby!
Throughout this whole process I was pumped full of fluids. In never having an IV I didn’t know what to expect. These made me very cold and I am typically a very hot person! At times I could not stop shivering, so I was layered in blankets.
Labor and Delivery!
It was finally time for the big event! It was definitely a new challenge to push with an epidural. One of the best parts of an epidural is reducing the pain, but an unintended consequence is not feeling the contractions or the act of pushing. In my circumstance I could not feel the act of pushing at the beginning of labor which made it hard to know if I was making any progress or actually pushing at all! It is hard to explain, but I could not feel anything, so when I was pushing I couldn’t tell if I was actually pushing and whether I was pushing in the right place! The nurse was supposed to dial back the epidural, but did not which caused my epidural to be too high. This can be a problem. Be sure to make sure your epidural is at the right level. The midwife caught this error and immediately fixed the issue decreasing the dose of my epidural.
Labor was a little scary . Our babies heart rate was dropping when I was pushing… My midwife called the doctor on call to be prepared to come in for a c-section or vacuum as I was having a hard time pushing and feeling the contractions from the epidural. Boy did that scare me! I pushed and pushed and pushed with my amazing coaches, my husband and Mom, along with my midwife who truly was the best and helped ensure I had a safe and vaginal delivery.
Within 30 minutes of active labor my precious baby girl was born vaginally and it was all worth the wait, pain and everything else endured in those 41 weeks. The small amount of time you will be in pain and discomfort are worth the lifetime of happiness you will receive.
My advice is accept that your birth plan can change. Make sure you stay informed throughout the whole process and question the medical staff if you think something isn’t right. Look into benefits of doctor delivery vs midwife to see what fits into your labor plan best. Most importantly no matter how awkward or painful something is it will all be over soon and you will have the best gift!
It seems like every day one of my friends is announcing they are pregnant on facebook in some unique way. There are ideas all over Pinterest, Etsy and Google advertising cute ways to announce you are pregnant. However, we all want ours to be unique and to fit our personalities, right? Take in all the ideas and think about who you are and what fits you best.
You will first need to decide when you want to make the announcement. We waited until about 16 weeks, so we were safely passed the 1st trimester, had two ultrasounds and baby was healthy. Make the announcement when you feel comfortable in your pregnancy to do so, as you will hear many more times throughout your pregnancy- every pregnancy is different.
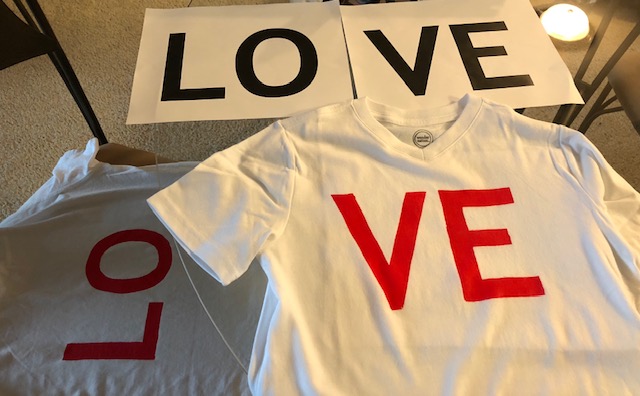
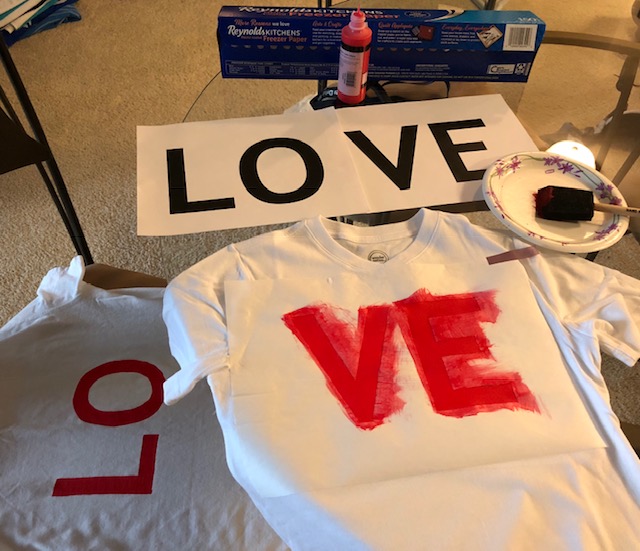
Our announcement included “And so our greatest adventure begins….”. It fit us perfectly as of all the travels, experiences and memories we have had this is sure to be our greatest adventure together. Then I tied in LOVE, creating two t-shirts, LO for my husband and VE for me. I opted several times throughout pregnancy to do some do it yourself (DIY) work as these shirts and props get expensive! Once you have the basic supplies it makes it easy to create more.
Think of a good hashtag, so you can use it in with all your pregnancy photos to remember your journey later on.
Items needed for DIY
Computer/ Printer to print design
Pencil for tracing
Freezer Paper (can be found at Walmart)
X-acto knife (can be found on Amazon)
Iron/ Ironing board
Fabric Paint
Foam brushes
T-shirts (used my husbands older white under shirts instead of buying new ones)
Piece of cardboard
Don’t worry too much if you aren’t that artistic, I definitely had some minor flaws in my final product but they were not noticeable in a picture.
Steps to create LOVE t-shirt
1.) Type LOVE in Microsoft Word and print in landscape format. I chose a very large chunky block lettering to make tracing easier.
2.) Put piece of freezer paper over the printed pages and trace the word. While doing this turn your iron on.
3.) Place a flat piece of cardboard (I cut mine out from an old box) behind the freezer paper.
4.) Use an X-acto knife to carefully cut the traced word out. Be careful as that knife is sharp!
5.) Put the letters aside and use the outline of the letters to iron onto the shirt. You will use this as a stencil to then paint inside. For the word LOVE, you will need to also iron on the inner circle of the O.
Tip: Before ironing make sure you know where you would like to iron the letters onto each shirt. Since my husband is taller than me, I needed to drop his letters on his shirt and raise mine up a little. They were not placed in the same location on both shirts as I wanted them to be in a straight line when standing next to one another.
6.) Place the piece of cardboard (or ironing board) between the front and back of the shirt and begin ironing on the freezer paper stencil. Be careful while doing this, as freezer paper is thin. Once the stencil of LO is ironed on securely, add the inner part of the O and carefully iron this on too.
7.) Repeat step 6 for the second shirt (VE) and beware of my tip above for placement. Make sure to iron all edges near the letters as we will be painting over these.
8.) Once both shirts have their stencils ironed on, it is time to paint! Pour some paint onto a disposable paper plate and use a foam brush to slowly paint inside the stencil. While painting keep the piece of cardboard between the front and back of shirt to prevent any paint seeping through the front of the shirt to the back. Repeat this step for each shirt.
9.) Check shirt throughout the next 15-20 minutes and if the color is too light than add another coat of paint to each shirt.
10.) Once the paint is dry, slowly peel back the freezer paper to reveal your fabulous new DIY shirts!
For our announcement we held up a onesie that said “And so our greatest adventure begins….. Baby K arriving January 2019”
If you are like us, super close to your family you will probably want to let them know just as soon as you find out you are expecting like we did! No matter how you tell them, whether it be creative or you just blurt it out their reaction will be just as excited and happy for you.
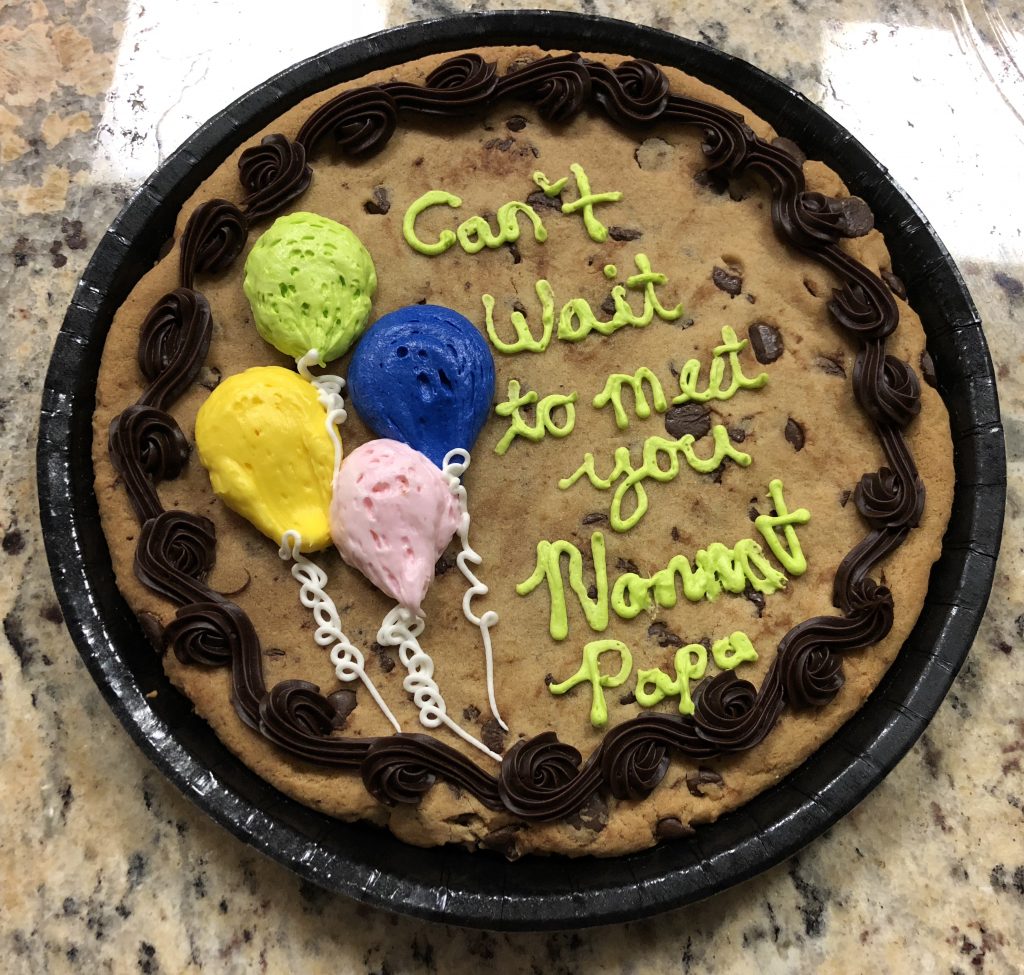
In this being our first child we wanted to do something unique, but that wasn’t expensive and could be done the same day. We don’t live by either of our families, so telling them in person was limiting. However, my husbands family happened to be visiting that week, so in person it could be! We waited until after work and bought a cake that said “I can’t wait to meet you Nonna and Papa!” When we came in the door, we told his parents that there was something not quite right with the cake and to come take a look. It was so cool watching them read the cake and see their amazing reaction!
My family was not in town at this time, but I still wanted to tell them immediately. So what else would you do then FaceTime them! We put the positive pregnancy test on the screen so as soon as they picked up that’s what they saw. It was yet another amazing moment watching them realize we were pregnant! Screams of joy and excitement bombarded the other end. How did we ever live without FaceTime?
There are so many unique ways to announce your pregnancy to your family, choose one that represents your personality and works best with your circumstance.